Tuesday, July 23, 2013

Trucker's Friend: A review of a sturdy roadside survival tool


The Zombie Apocalypse may soon be upon us. Now, if your like me, you understand the value of having a close quarters zombie capable weapon at hand while you take care of your daily tasks. Recently I have had the opportunity to test and review a new and innovative tool called the Trucker's Friend, a device designed as a zombie-slaying multi-tool. Think of the Trucker's Friend as a big Swiss Army knife for truck drivers, disaster, workers, and survivalists alike.


Innovation Factory, the creator of the Trucker's Friend, also makes a Firefighter Rescue Tool. This tool is almost identical to the Trucker's Friend. Being a Police Officer, I can definitely appreciate the tool's usefulness as a rescue tool. It is not possible for an Officer to carry a wide variety of rescue tools. The Trucker's Friend is a device that I believe fits the bill as a multi use rescue tool to replace a variety of devices needed to enter vehicles and structures fast. A jack of all trades, and a master of none, the Trucker's Friend is, from my testing, an excellent tool for someone who wants to be prepared for the worst scenario. Wether you need to pry, hack, or hammer your way through something, the Trucker's Friend is suited for the task.


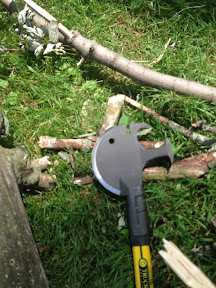
As a wilderness survival tool I feel the Trucker's Friend does fall short of it's mark. It is a heavy tool to carry into the wilderness (unless you like throwing your back out with a heavy pack. Don't be that guy...), and the curvature of the blade makes the tool difficult to cut through even wrist size branches. The steel used in the blade went dull rather quickly during my wood chopping test, and the cutting area is relatively small. After re-sharpening, the blade went dull after several uses.  Representatives from Innovation Factory advised me that the tool head is made from cast alloy 4130-4140 tool steel and is hardened and tempered to hold it's edge.  I am, however, pretty abusive to my survival tools, as was the case when I was testing the Trucker's Friend.  I am more likely to grab my favorite knife or small hand axe in these types of environments, and feel the Trucker's Friend is more suited to the urban survival environment.


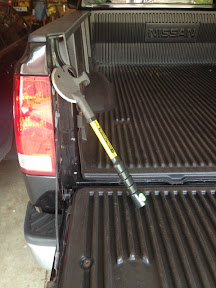
As a roadside tool, the Trucker's Friend excels. The device is capable of dismantling roadway obstructions, pulling nails from tires, and a variety of other applications. The Trucker's Friend is definitely a tool that I will keep in my truck for when I need it. I won't be doing any home remodeling with it (there are other tools better suited) but in a pinch, the Trucker's Friend will destroy whatever I need it to (including zombie limbs). I am selective about what I keep in my truck due to limited space (no toolbox), but this is one tool I want to have with me. The Trucker's Friend is thin enough to slide under a seat, granted, it would need a means to protect the blade. Even a small snap on plastic cover would suffice here.


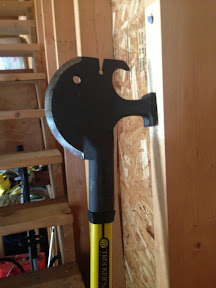
As a weapon, the tool actually reminds me of a medieval hand axe. Weighing in at 2.6 pounds and with a reach of almost 20 inches, it is definitely a mid range weapon. Overall, the tool was very sturdy, and the grip has ridges that prevented any kind of sliding. i would have preferred some type of knurling. and was initially skeptical of the grip Innovation Factory designed, but it seems to hold up well.

The Trucker's Friend would be complimented nicely with some sort of shoulder sling to facilitate the ever intimidating over the shoulder, ninja like sword draw. Even the biggest of zombies would cower in fear!

Interested in buying one for yourself? The Trucker's Friend retails for $59.99 and is available on Innovation Factory's website at http://innovationfactory.com/products/truckers-friend/

Wednesday, April 24, 2013

KRG Whiskey 3 rifle chassis demo and review

For those of us interested in a solid rifle chassis platform, check out the Whiskey 3 by Kinetic Research Group. KRG has put some thought into this one for sure. A modular platform with all the right features where you need them, the Whiskey 3 is an awesome option for those who have the cash to drop on a rock solid chassis. Check it out here:

Saturday, April 6, 2013

How to tie the Carrick Bend

One of my new favorite knots is the Carrick Bend. It is not technically a knot, as it is used to connect two lines together (bending). The Carrick Bend has a reputation for very secure, while being easy to untie. It is particularly useful in marine applications, where a wet rope could create jamming problems. The Carrick Bend looses a lot of strength, however, with it's sharp bends.

Begin the Carrick bend by forming a loop. A second loop will eventually be formed, and intertwined with the first loop. Place the working end of the second line underneath the first loop.


Take the working end of the unformed loop, and begin forming a second loop over the first, buy crossing over and under each section of line. if done correctly, there will be two identical loops intertwined.


This is how the complete bend should look before dressing and loading.


And this is the properly dressed Carrick Bend! Practice it a couple times and it becomes easy!

Saturday, March 23, 2013

Emergency communications during a disaster


During a disaster, our ability to communicate with others becomes extremely important. Communication can take many forms, including telephones, fm radios, televisions, and so forth. With all the different communication options that exist, what form of communication is best during a disaster or emergency?

The short answer, is there is no answer. With so many different forms of communication out there, it is impossible to determine which communication medium will best serve your purpose. Cellular phones are one of the most current and prevalent forms of communication, and for good reason; They are reliable, capable of communicating anywhere in the country (or world for that matter), and portable. Cellular communication is going to be the primary form of communication with anyone, prepared or not, in a disaster. During Superstorm Sandy, in New York City and other parts of the country, businesses were allowing people to charge their phones with their power supplies so that people could communicate with the outside world. In a disaster, no matter how much preparing one does and how much money one spends on equipment, the cell phone is going to be the primary source of information.

Besides the cell phone, there is one item that I recommend that any disaster-conscious person purchase: a handheld amateur radio. These radios are capable of preforming multiple functions, and you can receive information from a WIDE variety of external sources. Amateur radios are capable of listening to NOAA weather bands, police and fire frequencies, amateur weather spotting frequencies, FRS (family radio service) frequencies, marine bands, and so on. An amateur radio is so versatile that I recommend everyone purchase one. To speak on an amateur radio requires a federal license, but with a little studying, these are easy to obtain and last 10 years. Even if you don't get an amateur radio license, you can still listen to communication, you simply cannot transmit. It is extremely beneficial to be able to listen to what is happening around you. Police bands will be able to tell you exactly what is happening in your neighborhood during a disaster. In an emergency, with no other means of communication, an unlicensed person is legally allowed to transmit an emergency call for help on an amateur radio, thus, owning one could saver your life.


The radio pictured above is a Baofeng UV-5R. It is OBVIOUSLY not American made, but this is a cheap, reliable radio that can be owned by anyone for $40 US Dollars. I have two of them, and carry one with me daily. The UV-5R's are amazingly versatile. They are equipped with FM radio, marine frequencies, NOAA weather frequencies, VHF and UHF frequencies which will allow you to listen to most local emergency responders, and they even have a flashlight feature. At this cost, anyone can purchase and own an amateur radio that they can use to listen to and communicate with. A radio similar to this should be a part of everyone's emergency disaster kit, and at $40, you should have one in the house, and in each vehicle you own.


Alternative forms of communication include CB radios, FRS radios, shortwave radios, televisions, etc. But I feel that none of these options have the versatility that you could have with an amateur radio, and I would highly recommend you keep one as a way to learn what is happening around you.

Wednesday, February 27, 2013

Getting started in blacksmithing

It should come as no surprise to most who know me that I have some abnormal hobbies. Well, abnormal is subjective, because I think it is totally normal. I have always had a fascination with the "old way" of doing things. I enjoy making things by hand, with traditional tools. I love to study technology from early time periods...firecraft, homesteading, tool making, and self reliance. So one day I decided that I wanted to learn something new: Blacksmithing!

My interest began like most my interests do...on the internet, doing research. I eventually purchased a book and began to learn about the art. From the techniques used to create things, to how to build the forge. Going to a local scrap yard, I was able to speak with the owner, who happened to have an anvil for me. a 136 pound, rusty, crude looking anvil. He cut me a deal, $10.00, to get it out of his shop. Little did I know what that hunk of metal I bought was valued at!


A little clean up with a wire wheel, and the anvil became a much prettier piece of steel! I was able to identify the anvil as a Arm and Hammer, worth much more than $10.00 to say the least.


So once I bought the anvil, it was time to build the forge and stand. The forge design was easy. One search on Google and I came of with the brake drum forge. Thanks to a guy at work, I got my hands on a drum for free. Then I bought some sections of 2 inch black pipe to create the forge base piping. The drum is attached to the floor flange by drilling holes and simply bolting it on.


Then I bought two sections of 6x4 treated lumber. I measured the right length and cut the sections. I had trouble cutting them all to the right length, so I had to put some work into evening them out. I then used some hardwood for a top and bottom plate. (The anvil rusted a little since it was sitting in the garage during a temperature swing. A little more wire wheel treatment should get rid of it).


And that's it! My poor neighbors may soon hear the ping! ping! ping! of metal being pounded and twisted into awesomeness.

Thursday, February 21, 2013

New website design!

Beardventures has been re-designed! I am going to start categorizing all my blog posts into the categories at the top of the page. I will reserve the main page for updates, important blog posts, and GIVEAWAYS! With any luck I will be starting some giveaways for anyone who follows my blog and comments. Details will come later!

Tuesday, February 19, 2013

Cold Weather Survival Shelter Testing

Last week a friend and I decided to go on a winter bushcraft/survival skills trip. The projected low for the night was 15 degrees with a wind chill of 9 degrees. Actual was 12 degrees, with wind chill at 6 degrees. So it was cold to say the least. The perfect night to build a debris hut!

Our first order of business was to select a suitable camp location. The property we were on had a large stream running through it, so water was not an issue. We eventually settled on a location right along the stream, and slightly elevated to stay out of the cold sink. We decided a two-person debris hut would be the most appropriate shelter given the cold conditions, so we began constructing the frame. We placed the foot end towards the wind, and constructed the hut much like a traditional debris hut, but built a flat roof connecting the two hut frames.


The sides and roof were constructed by lashing a few cross pieces to keep the framing sections from rolling off the frame.


The sides were then filled in with leaves. As long as you pile leaves starting at the bottom and building upwards, they don't fall through the framework. At least 2 feet of debris is necessary to insulate and keep the wind out.


We then started a fire, which carried us through the evening. 12 degrees was manageable with a good fire, and the woods provided plenty of dead wood for the fire. The shelter turned out to be pretty warm. We did cheat and use camp pads (hey, we can't leave ALL the luxuries behind) and sleeping bags. Without them we would have been cold, but alive!

Wednesday, February 13, 2013

Using the Vargo Titanium wood stove and Kleen Kanteen bottle


A while ago I bought a Vargo Titanium Hex stove and a Kleen Kanteen single wall stainless water bottle. Well, the stove and the bottle were just too pretty, and I just had to get them dirty, so I decided to actually get outside and play with them. Why wood stove? Well, I like the idea of not having to carry fuel. Not to mention the ambiance that even a small fire gives me. It’s that camping smell! For someone who wants less fuss, I would recommend looking into alcohol stoves, or if you prefer something even easier, then a canister or gas stove.

Tools I used to uglify my survival bottle/stove:


This is the stove. Notice how it is set up. There are several folding panels which flip up and snap into the attached base. The result is a hexagonal tube which has a single door to put combustibles inside. Everything folds down flat into that small black pouch you saw in the first picture.


The bottom has holes in it for air flow, and it sits slightly elevated. Being environmentally conscious, I like the idea here because it protects the ground and promotes leave no trace ethics every outdoorsman/outdoorswoman should strive for.


To get my water to a boil, I used my dryer lint and some wood shavings as my starter. Small twigs were added on top of that, and I ignited it using a firesteel. I then added small sticks, no longer than 3-4 inches and no thicker than a finger, since I just wanted enough fire to boil water.


Success! The fire was started. Once it was going well I closed the door, opening it occasionally to add fuel. The boil took about 10 minutes, but with practice I could get it down quicker. One of the things I noticed was how dirty cooking on a wood stove is compared to alcohol stoves. Due to the imperfect combustion of a wood fire, the bottom of your bottle becomes coated in soot. The inside of the stove does as well. Not a huge problem, but something to keep in mind when you decide to place that bottle back in your expensive backpack. The stove, of course, has that nice nylon case, so no worries there.


As light as this stove is at 4.1 ounces, this is something nice to have in the bottom of your backpack for when you underestimate how much fuel you need and run out!

Selecting the right type of rope for the job

This is part of my series on rope basics! For part one please visit: Learning about rope and cordage

So of all the different kinds of rope, what right t do you purchase for your application? In order to do this, you have to ask yourself some questions. How strong a rope do I need? How much stretch can I tolerate? Will this rope get wet or freeze? What type of loads will this rope be subjected to?


Of course, when we’re talking survival cord, almost anything goes. Most people carry 550 paracord (which was used for rigging parachutes in the military, not sure if it still is). 550 cord is strong (hence the name, rated to be about 550lb breaking strength), lightweight, and versatile. It consists of an outer sheath with 7 small inner strands. Paracord stretches, but usually does not return to its original length. The inner strings can be removed and used individually to create a net, fishing line, trap line, or to extend the length of the cord. Bank line (nylon twine), even line from a child’s kite (keep it on the handle for ease of carrying) works great for survival. Remember though, when it comes to surviving anything you have with you at the time works.

For marine or water applications, rope must be chosen carefully. Certain rope is better suited for use as lines on a boat than others. For anchor line, nylon is the way to go. The stretch should provide some relief on the anchor so the boat doesn’t uproot it. On a sailboat, lines are most important. For the halyards you want a very low stretch, high UV resistant rope. Dyneema would be a good choice here, though some use polyester as well. The halyards must be able to hold the sails up tight while not giving much. When it comes to the sheets (for those of you that don’t know sailing, sheets are the lines attached to the control end of the sails) stretch is not as important, but still should not be too stretchy. Handfeel is incredibly important here so you don’t tear up your skin trying to haul the sheets in (that also means pick the larger diameter sheets ) Polyester is widely used for this purpose. Heck, polyester is widely used for most lines on a sailboat. Dyneema is expensive stuff, so lots of people use polyester, unless they are racing and rope selection means winning or losing a race.


Rope is, of course, widely used for rescue, rock climbing, rappelling, tree climbing (for you arborists), and caving. For these applications, almost all rope is kernmantle construction, and made of nylon. When a climber falls, a huge amount of force is placed onto the rope. If the rope were static, low stretch rope, a climber would most likely not survive a fall, as they would break their back. Thus, nylon rope is used so that the climber bounces at the bottom of the rope (called dynamic rope). Climbing ropes come in a variety of diameters, from skinny 8mm twin ropes (rope designed to be used in pairs, doubled up to every protection point) to chunky 13mm rescue rope. Static rope is used as well, but generally for rappelling, rescue, or for slings.


And by popular request from my friends over at Hammock Forums, I will touch on rope used in a hammock suspension! Hammock suspensions must deal with a large amount of force. Though mostly static force, we are asking a lot from our thin ropes that we use to keep us hanging in the trees! There is more than just our body weight on the hammocks though, when you consider angular forces, the additional weight from bounce when we get in them, etc. Amsteel, a brand of rope using (you guessed it) Dyneema, is one of the most popular ropes for the hammock suspension. The stuff is amazingly strong and very low weight. Dyneema (High Modulus Polyethylene) is, in my opinion, the best suspension out there. Though it costs more, the weight and size differences are huge! Amsteel is stronger than a metal cable with the same diameter. With my 2 hammocks I use Amsteel whoopee slings for the suspension connected to nylon tree straps. The only downside is the cost.

Warbonnet Blackbird hammock & Whoopie Slings

As far as tarp suspensions go, we want low stretch here as well. I like high visibility line so I don’t trip over them once they are in place. Zing-It, an arborist throw line, is popular due to its size, strength, and relatively cheap cost. I personally use Glowire sold on Lawsonequipment.com. It is a Dyneems/Dacron hybrid and highly reflective orange rope. It’s only rated to 225 lbs, which makes a perfect tarp line, but not suitable for hammock suspension. They put reflective tracers in the wire to really make it stand out.
Almost all lines used in hammock applications are braided. This is due to its higher strength. Twisted rope is really not used all that much in any application, except maybe on boats. Kernmantle is really a specialty rope that is used for limited and specific applications.

Warbonnet Blackbird hammock & Whoopie Slings

All that being said, next week I will be talking knots! I will list my top 10 knots, including how to tie and use them!


Monday, February 4, 2013

Learning about rope and cordage types


There is no doubt of the usefulness of rope and cordage. Rope can be used to tie a clothesline in the backyard, used to haul food out of the reach of critters, set traps, or even tie your kids up in a closet when they misbehave (don’t do this please-it would be funny, but you would probably go to jail. Not cool).

So with all the different uses out there, it should come as no surprise that there are many different kinds of rope, and it can be confusing. I am going to try and give everyone a little ropeducation (it’s the best I could come up with. Sorry, it’s embarrassing).


Let’s start with the two basic rope material categories: natural and synthetic. The vast majority of rope today is synthetic. Synthetic rope is made up of man-made, engineered material. These are your nylons, polypropylenes, polyesters, and others. There are MANY different types of man-made rope materials. Some are better than others. For example, Nylon is one of the strongest synthetic ropes, but loses some of its strength when wet. Polypropylene is cheap and relatively strong, but is prone to break down in UV rays. Polyester has much less stretch than nylon, just as strong, and more durable. But polyester is more expensive. The picture at the top of this post is of a climber carrying synthetic rope.

Hemp Rope


There second rope material is natural rope. Natural is anything you find in nature which can be used as rope or cordage. Synthetic rope is better than natural rope in almost all situations. It is heavier, weaker, and bulkier. Natural rope that you can purchase at a store is generally some variation of hemp rope. Above is an example of hemp rope. Notice the frays of hemp that make up the rope.

Twisted rope


Now that we have that out of the way, let’s talk about rope construction. Rope is made by taking small strands of a fiber and twisting them together in a pattern to create a larger, stronger strand. There are a few different construction types: twisted, braided, and kernmantle.

Twisted rope is exactly how it sounds: individual fibers twisted together, forming a rope with a twisted look. Twisted rope is the weakest and cheapest type of rope construction.

The next step up in strength is braided rope. Rope can be single or double braided. Single braid consists of individual strings braided together, much like hair is braided. Double braided is basically a braid inside of another braid.

The strongest and most abrasion resistant material is kernmantle. Kernmantle rope consists of an inner core and and outer sheath. The core is generally twisted together, and the outer shell is braided. This is what you see in climbing ropes and other high demand applications. It is naturally one of the most expensive rope types.

Braided rope

Kernmantle rope showing the core

So with all the different types of rope, what do you need? Your rope selection will depend primarily on the application. After all, some of us (climbers, military, law enforcement, firefighters) use rope to save lives. Others use rope to protect expensive investments (it would be a shame to see your yacht playing bumper boats with others in the marina because you used sub-par rope). See part two of my rope and cordage series: Selecting the right type of rope.

Thursday, January 31, 2013

What to put in an Altoid survival tin

One of the best uses for those old Altoid mint cans? Turn it into a survival kit! With a few things from around the house, you will have with you an awesome pocket survival kit that you can take with you on your next trip to the wilderness. Or you next trip to the mall. After all, you never know when the zombie apocalypse may happen, so you should probably take it with you everywhere!

Saturday, January 26, 2013

SA Wetterlings Wildlife axe- review and impressions

I have long been looking for the perfect outdoor cutting tool. The problem is, no such tool exists. Different tools exist for different jobs. I have always been a lightweight hiker and I don't believe in taking everything, including the kitchen sink, into the wilderness. My back just doesn't like it. I am not an ultralight hiker, and I don't obsess about pack weight, but I only take necessities and weight is of primary concern to me. So until now, I have always carried knives as my primary cutting tool.

Things changed for me when I started contemplating sea touring on a kayak. Kayaks can easily accommodate one hundred or more pounds of gear, so weight is not a concern there. That is when I started looking at camp axes and hatchets. After doing my homework, I decided that their were two viable options for me, Gransfors Bruks, or SA Wetterlings. The Wetterlings line seemed appealing to me for a few reasons. For one, they were slightly cheaper than Gransfors. Both were made in Sweden, and both hand forged. One of the reasons why Wetterlings appealed to me is because the CEO was a woman.

Julia Kalthoff, CEO of SA Wetterlings, is not just a CEO that fell into the trade. Julia is an actual blacksmith who knows axes. It impresses me that an outdoor company in a predominantly male trade would hire a female CEO. It may be a silly reason, but this, along with Wetterlings reputation for quality, persuaded me to buy a Wetterlings axe.

I scoured the Internet and found the axe for me. A 13 inch hatchet length axe, Wetterlings Wildlife model.


Once I received the tool, I was immediately impressed. The Wildlife axe was sharp enough to shave my bear-like arms right out of the box. It has a smooth, gently curved 13 inch hickory handle which was perfect for both powerful swings and shaving wood by choking up on the handle. The color of the wood was uniform and did not have any major imperfections. The axe head itself was about 2 1/2 inches wide and about 5 inches long. The blade is ground to a 24 degree profile according to Wetterlings. It should be noted that the exact specs vary, because each axe is hand forged.


The cutting edge on this axe is amazing. Without any effort I was able to chop wood. The size is perfect for making fur strips to start a fire. It is small enough to stow away on a kayak, or even in a backpack for that matter. For winter hiking, this is now a required piece of equipment for me. I might even carry it in the summer! Of course, it's no replacement for a small knife, but it is a wonderful tool that serves its purpose well.


The Wetterlings Wildlife axe, as with all Wetterlings axes, comes with a leather sheath. Some do not like the sheath. The sheath is more of an edge guard than it is full length protection for the axe head. I suspect it is less about protecting the blade and more about protecting me from loosing my fingers. I may make a new sheath for it. Or I may just leave it as it is. Either way, for $75 bucks, this axe was a steal!

-Beardman

Wednesday, January 23, 2013

Kabar FIN video review

Here it is, the Kabar FIN fixed blade review.  This is a great little knife, take a look:


Building a skin on frame kayak

For the past year I have been building a skin on frame kayak. This may appeal to some of you traditionalists who enjoy building your own stuff. I thought about the idea for some time, and finally started to take the plunge. This kayak is based off of Tom Yost's Sea Tour design, with some small modifications. The frame is almost complete, and I have to work on the skin next.

The general idea is to construct cross sections, like the fuselage of an airplane. Then you run stringers down the cross sections to create the shape of the boat.


Above you can see the stringers attached to the first and last cross section. As cross sections are added, the stringers take the shape of the boat.


Then the stem plates are added at the bow and stern. These are free design, so I could make them any shape I desired. I chose to make them somewhat steep to allow the boat to track straighter.

With any luck I will be able to finish the boat and post some photographs soon!

Any questions, feel free to e-mail me. Also, I must give credit to Tom Yost at Yostwerks.com as that is where my ideas came from. He has a VERY comprehensive how to on his website.

Tuesday, January 22, 2013

Becker BK2 modification

About a year ago I found the finish on my Becker BK2 was coming off from use. Not wanting an ugly knife, but still wanting to abuse it, I decided to remove the finish from the blade. I put the blade in a chemical stripper, and WEARING GLOVES, I removed the finish from the blade. This is not enough, because with type of steel on the BK2, it is likely the blade will rust. I took the blade and forced a patina by placing the blade in a vinegar solution. I then pulled the blade out and allowed the patina to form to my liking, wiping the vinegar off when it reached the color I wanted. Then I took the stock handles and traced them onto cocobolo (a dark rosewood). The end result was shaped using a drum sanding bit on my drill press. They aren't perfect, but the look was much improved! The knife continued to be abused, and the finish holds up really well.
I liked the results so much, I decided to patina my Mora Number 2. I stripped the ugly red paint off the handle, then dipped it in polyshades (a stain/polyurethane mixture). The blade was then stuck into an onion to develop a patina. If there is enough interest, I will put together a guide on forced patina.

Building a West Greenland Kayak Paddle

Yesterday I did more work on my kayak paddle. The paddle is shaped from a clear (or almost clear) 2x4. Any material works. I used pine, but would have used cedar if I could have actually found some. First I laid out the dimensions on the 2x4. The first step was to cut the blade taper. I initially tried using a band saw, but the process went very slow since I was cutting the 2x4 lengthwise. I then figured out that the best was is the old fashion hand plane.
The surfaces were planed down to thickness, then the profile had to be drafted and cut to shape. Once shaped, the shaping profile had to be drawn on. This is as far as I have gotten so far. The garage has become far too cold, as were down into the single digits in Ohio with a negative wind chill. So my paddle sits on the livingroom floor, begging to be completed.
A big thank you goes to Chuck Holst for providing the online community with a FREE how to for making a Greenland style kayak paddle. His guide can be found at http://www.qajaqusa.org/QK/makegreen2.pdf There are also plenty of videos on YouTube showing the process in detail.

Monday, January 21, 2013

Necky Manitou 146R

I am going to be IN TROUBLE. The new Necky Manitou 146R has arrived. I tried to hang it in the garage out of my wife's sight. But it's hard to hide a 15' kayak. Oh well.
And to transport it, a hitch extension for my truck. It works in 2 configurations, one to carry the boat on the roof of the truck, the other to carry it in the bed.
Nothing like having a brand new kayak, then having to hang it in the garage until spring. Oh well, something else to look forward to I guess.