
One of the best uses for those old Altoid mint cans? Turn it into a survival kit! With a few things from around the house, you will have with you an awesome pocket survival kit that you can take with you on your next trip to the wilderness. Or you next trip to the mall. After all, you never know when the zombie apocalypse may happen, so you should probably take it with you everywhere!
Thursday, January 31, 2013


Saturday, January 26, 2013
SA Wetterlings Wildlife axe- review and impressions
I have long been looking for the perfect outdoor cutting tool. The problem is, no such tool exists. Different tools exist for different jobs. I have always been a lightweight hiker and I don't believe in taking everything, including the kitchen sink, into the wilderness. My back just doesn't like it. I am not an ultralight hiker, and I don't obsess about pack weight, but I only take necessities and weight is of primary concern to me. So until now, I have always carried knives as my primary cutting tool.
Things changed for me when I started contemplating sea touring on a kayak. Kayaks can easily accommodate one hundred or more pounds of gear, so weight is not a concern there. That is when I started looking at camp axes and hatchets. After doing my homework, I decided that their were two viable options for me, Gransfors Bruks, or SA Wetterlings. The Wetterlings line seemed appealing to me for a few reasons. For one, they were slightly cheaper than Gransfors. Both were made in Sweden, and both hand forged. One of the reasons why Wetterlings appealed to me is because the CEO was a woman.
Julia Kalthoff, CEO of SA Wetterlings, is not just a CEO that fell into the trade. Julia is an actual blacksmith who knows axes. It impresses me that an outdoor company in a predominantly male trade would hire a female CEO. It may be a silly reason, but this, along with Wetterlings reputation for quality, persuaded me to buy a Wetterlings axe.
I scoured the Internet and found the axe for me. A 13 inch hatchet length axe, Wetterlings Wildlife model.
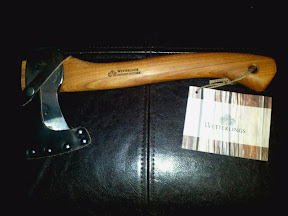
Once I received the tool, I was immediately impressed. The Wildlife axe was sharp enough to shave my bear-like arms right out of the box. It has a smooth, gently curved 13 inch hickory handle which was perfect for both powerful swings and shaving wood by choking up on the handle. The color of the wood was uniform and did not have any major imperfections. The axe head itself was about 2 1/2 inches wide and about 5 inches long. The blade is ground to a 24 degree profile according to Wetterlings. It should be noted that the exact specs vary, because each axe is hand forged.
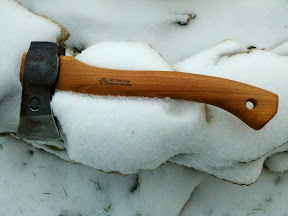
The cutting edge on this axe is amazing. Without any effort I was able to chop wood. The size is perfect for making fur strips to start a fire. It is small enough to stow away on a kayak, or even in a backpack for that matter. For winter hiking, this is now a required piece of equipment for me. I might even carry it in the summer! Of course, it's no replacement for a small knife, but it is a wonderful tool that serves its purpose well.

The Wetterlings Wildlife axe, as with all Wetterlings axes, comes with a leather sheath. Some do not like the sheath. The sheath is more of an edge guard than it is full length protection for the axe head. I suspect it is less about protecting the blade and more about protecting me from loosing my fingers. I may make a new sheath for it. Or I may just leave it as it is. Either way, for $75 bucks, this axe was a steal!
-Beardman
Things changed for me when I started contemplating sea touring on a kayak. Kayaks can easily accommodate one hundred or more pounds of gear, so weight is not a concern there. That is when I started looking at camp axes and hatchets. After doing my homework, I decided that their were two viable options for me, Gransfors Bruks, or SA Wetterlings. The Wetterlings line seemed appealing to me for a few reasons. For one, they were slightly cheaper than Gransfors. Both were made in Sweden, and both hand forged. One of the reasons why Wetterlings appealed to me is because the CEO was a woman.
Julia Kalthoff, CEO of SA Wetterlings, is not just a CEO that fell into the trade. Julia is an actual blacksmith who knows axes. It impresses me that an outdoor company in a predominantly male trade would hire a female CEO. It may be a silly reason, but this, along with Wetterlings reputation for quality, persuaded me to buy a Wetterlings axe.
I scoured the Internet and found the axe for me. A 13 inch hatchet length axe, Wetterlings Wildlife model.
Once I received the tool, I was immediately impressed. The Wildlife axe was sharp enough to shave my bear-like arms right out of the box. It has a smooth, gently curved 13 inch hickory handle which was perfect for both powerful swings and shaving wood by choking up on the handle. The color of the wood was uniform and did not have any major imperfections. The axe head itself was about 2 1/2 inches wide and about 5 inches long. The blade is ground to a 24 degree profile according to Wetterlings. It should be noted that the exact specs vary, because each axe is hand forged.
The cutting edge on this axe is amazing. Without any effort I was able to chop wood. The size is perfect for making fur strips to start a fire. It is small enough to stow away on a kayak, or even in a backpack for that matter. For winter hiking, this is now a required piece of equipment for me. I might even carry it in the summer! Of course, it's no replacement for a small knife, but it is a wonderful tool that serves its purpose well.
The Wetterlings Wildlife axe, as with all Wetterlings axes, comes with a leather sheath. Some do not like the sheath. The sheath is more of an edge guard than it is full length protection for the axe head. I suspect it is less about protecting the blade and more about protecting me from loosing my fingers. I may make a new sheath for it. Or I may just leave it as it is. Either way, for $75 bucks, this axe was a steal!
-Beardman
Wednesday, January 23, 2013
Kabar FIN video review
Here it is, the Kabar FIN fixed blade review. This is a great little knife, take a look:
Building a skin on frame kayak
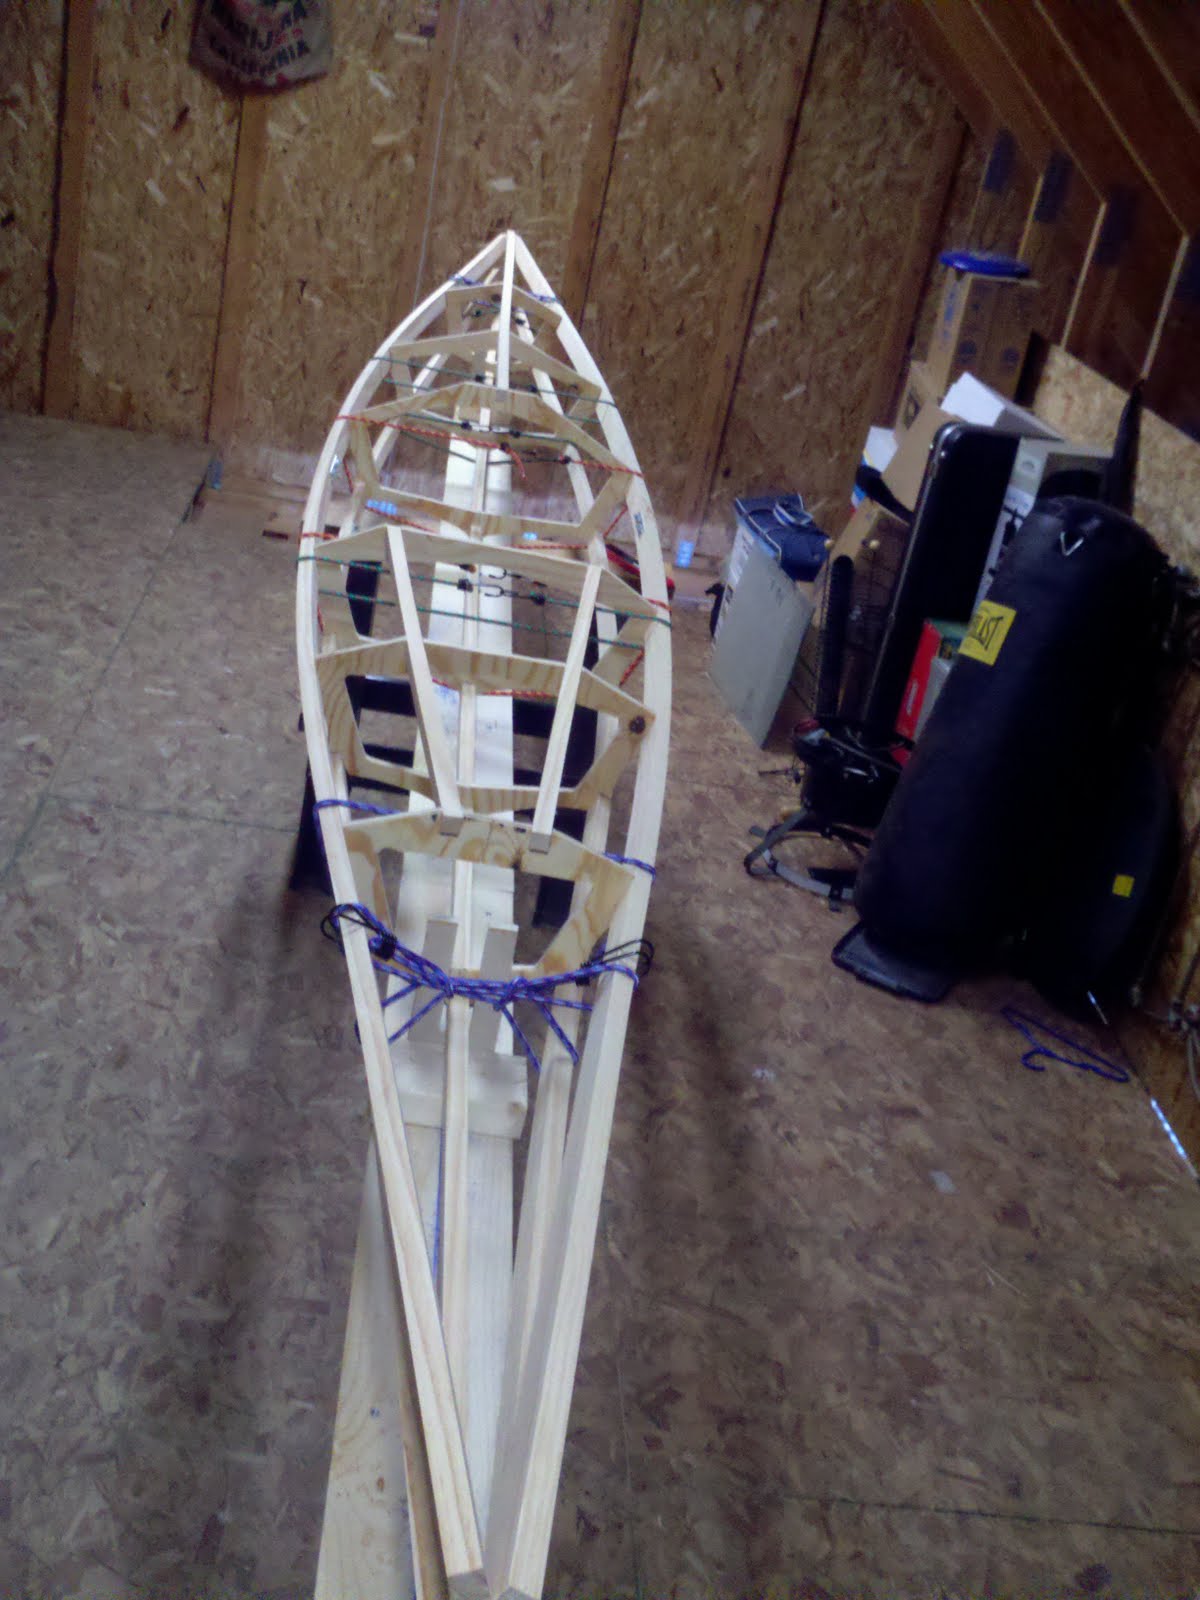
For the past year I have been building a skin on frame kayak. This may appeal to some of you traditionalists who enjoy building your own stuff. I thought about the idea for some time, and finally started to take the plunge. This kayak is based off of Tom Yost's Sea Tour design, with some small modifications. The frame is almost complete, and I have to work on the skin next.
The general idea is to construct cross sections, like the fuselage of an airplane. Then you run stringers down the cross sections to create the shape of the boat.

Above you can see the stringers attached to the first and last cross section. As cross sections are added, the stringers take the shape of the boat.

Then the stem plates are added at the bow and stern. These are free design, so I could make them any shape I desired. I chose to make them somewhat steep to allow the boat to track straighter.
With any luck I will be able to finish the boat and post some photographs soon!
Any questions, feel free to e-mail me. Also, I must give credit to Tom Yost at Yostwerks.com as that is where my ideas came from. He has a VERY comprehensive how to on his website.
Tuesday, January 22, 2013
Becker BK2 modification
About a year ago I found the finish on my Becker BK2 was coming off from use. Not wanting an ugly knife, but still wanting to abuse it, I decided to remove the finish from the blade. I put the blade in a chemical stripper, and WEARING GLOVES, I removed the finish from the blade. This is not enough, because with type of steel on the BK2, it is likely the blade will rust. I took the blade and forced a patina by placing the blade in a vinegar solution. I then pulled the blade out and allowed the patina to form to my liking, wiping the vinegar off when it reached the color I wanted. Then I took the stock handles and traced them onto cocobolo (a dark rosewood). The end result was shaped using a drum sanding bit on my drill press. They aren't perfect, but the look was much improved! The knife continued to be abused, and the finish holds up really well.

 I liked the results so much, I decided to patina my Mora Number 2. I stripped the ugly red paint off the handle, then dipped it in polyshades (a stain/polyurethane mixture). The blade was then stuck into an onion to develop a patina. If there is enough interest, I will put together a guide on forced patina.


Building a West Greenland Kayak Paddle
Yesterday I did more work on my kayak paddle. The paddle is shaped from a clear (or almost clear) 2x4. Any material works. I used pine, but would have used cedar if I could have actually found some. First I laid out the dimensions on the 2x4. The first step was to cut the blade taper. I initially tried using a band saw, but the process went very slow since I was cutting the 2x4 lengthwise. I then figured out that the best was is the old fashion hand plane.  The surfaces were planed down to thickness, then the profile had to be drafted and cut to shape. Once shaped, the shaping profile had to be drawn on. This is as far as I have gotten so far. The garage has become far too cold, as were down into the single digits in Ohio with a negative wind chill. So my paddle sits on the livingroom floor, begging to be completed.
 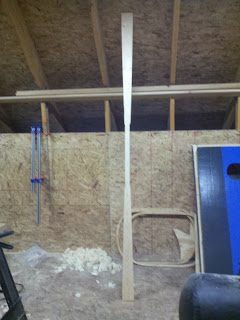 A big thank you goes to Chuck Holst for providing the online community with a FREE how to for making a Greenland style kayak paddle. His guide can be found at http://www.qajaqusa.org/QK/makegreen2.pdf There are also plenty of videos on YouTube showing the process in detail.


Monday, January 21, 2013
Necky Manitou 146R


Subscribe to:
Posts (Atom)