Tuesday, July 23, 2013

Trucker's Friend: A review of a sturdy roadside survival tool


The Zombie Apocalypse may soon be upon us. Now, if your like me, you understand the value of having a close quarters zombie capable weapon at hand while you take care of your daily tasks. Recently I have had the opportunity to test and review a new and innovative tool called the Trucker's Friend, a device designed as a zombie-slaying multi-tool. Think of the Trucker's Friend as a big Swiss Army knife for truck drivers, disaster, workers, and survivalists alike.


Innovation Factory, the creator of the Trucker's Friend, also makes a Firefighter Rescue Tool. This tool is almost identical to the Trucker's Friend. Being a Police Officer, I can definitely appreciate the tool's usefulness as a rescue tool. It is not possible for an Officer to carry a wide variety of rescue tools. The Trucker's Friend is a device that I believe fits the bill as a multi use rescue tool to replace a variety of devices needed to enter vehicles and structures fast. A jack of all trades, and a master of none, the Trucker's Friend is, from my testing, an excellent tool for someone who wants to be prepared for the worst scenario. Wether you need to pry, hack, or hammer your way through something, the Trucker's Friend is suited for the task.


As a wilderness survival tool I feel the Trucker's Friend does fall short of it's mark. It is a heavy tool to carry into the wilderness (unless you like throwing your back out with a heavy pack. Don't be that guy...), and the curvature of the blade makes the tool difficult to cut through even wrist size branches. The steel used in the blade went dull rather quickly during my wood chopping test, and the cutting area is relatively small. After re-sharpening, the blade went dull after several uses.  Representatives from Innovation Factory advised me that the tool head is made from cast alloy 4130-4140 tool steel and is hardened and tempered to hold it's edge.  I am, however, pretty abusive to my survival tools, as was the case when I was testing the Trucker's Friend.  I am more likely to grab my favorite knife or small hand axe in these types of environments, and feel the Trucker's Friend is more suited to the urban survival environment.


As a roadside tool, the Trucker's Friend excels. The device is capable of dismantling roadway obstructions, pulling nails from tires, and a variety of other applications. The Trucker's Friend is definitely a tool that I will keep in my truck for when I need it. I won't be doing any home remodeling with it (there are other tools better suited) but in a pinch, the Trucker's Friend will destroy whatever I need it to (including zombie limbs). I am selective about what I keep in my truck due to limited space (no toolbox), but this is one tool I want to have with me. The Trucker's Friend is thin enough to slide under a seat, granted, it would need a means to protect the blade. Even a small snap on plastic cover would suffice here.


As a weapon, the tool actually reminds me of a medieval hand axe. Weighing in at 2.6 pounds and with a reach of almost 20 inches, it is definitely a mid range weapon. Overall, the tool was very sturdy, and the grip has ridges that prevented any kind of sliding. i would have preferred some type of knurling. and was initially skeptical of the grip Innovation Factory designed, but it seems to hold up well.

The Trucker's Friend would be complimented nicely with some sort of shoulder sling to facilitate the ever intimidating over the shoulder, ninja like sword draw. Even the biggest of zombies would cower in fear!

Interested in buying one for yourself? The Trucker's Friend retails for $59.99 and is available on Innovation Factory's website at http://innovationfactory.com/products/truckers-friend/

Wednesday, April 24, 2013

KRG Whiskey 3 rifle chassis demo and review

For those of us interested in a solid rifle chassis platform, check out the Whiskey 3 by Kinetic Research Group. KRG has put some thought into this one for sure. A modular platform with all the right features where you need them, the Whiskey 3 is an awesome option for those who have the cash to drop on a rock solid chassis. Check it out here:

Saturday, April 6, 2013

How to tie the Carrick Bend

One of my new favorite knots is the Carrick Bend. It is not technically a knot, as it is used to connect two lines together (bending). The Carrick Bend has a reputation for very secure, while being easy to untie. It is particularly useful in marine applications, where a wet rope could create jamming problems. The Carrick Bend looses a lot of strength, however, with it's sharp bends.

Begin the Carrick bend by forming a loop. A second loop will eventually be formed, and intertwined with the first loop. Place the working end of the second line underneath the first loop.


Take the working end of the unformed loop, and begin forming a second loop over the first, buy crossing over and under each section of line. if done correctly, there will be two identical loops intertwined.


This is how the complete bend should look before dressing and loading.


And this is the properly dressed Carrick Bend! Practice it a couple times and it becomes easy!

Saturday, March 23, 2013

Emergency communications during a disaster


During a disaster, our ability to communicate with others becomes extremely important. Communication can take many forms, including telephones, fm radios, televisions, and so forth. With all the different communication options that exist, what form of communication is best during a disaster or emergency?

The short answer, is there is no answer. With so many different forms of communication out there, it is impossible to determine which communication medium will best serve your purpose. Cellular phones are one of the most current and prevalent forms of communication, and for good reason; They are reliable, capable of communicating anywhere in the country (or world for that matter), and portable. Cellular communication is going to be the primary form of communication with anyone, prepared or not, in a disaster. During Superstorm Sandy, in New York City and other parts of the country, businesses were allowing people to charge their phones with their power supplies so that people could communicate with the outside world. In a disaster, no matter how much preparing one does and how much money one spends on equipment, the cell phone is going to be the primary source of information.

Besides the cell phone, there is one item that I recommend that any disaster-conscious person purchase: a handheld amateur radio. These radios are capable of preforming multiple functions, and you can receive information from a WIDE variety of external sources. Amateur radios are capable of listening to NOAA weather bands, police and fire frequencies, amateur weather spotting frequencies, FRS (family radio service) frequencies, marine bands, and so on. An amateur radio is so versatile that I recommend everyone purchase one. To speak on an amateur radio requires a federal license, but with a little studying, these are easy to obtain and last 10 years. Even if you don't get an amateur radio license, you can still listen to communication, you simply cannot transmit. It is extremely beneficial to be able to listen to what is happening around you. Police bands will be able to tell you exactly what is happening in your neighborhood during a disaster. In an emergency, with no other means of communication, an unlicensed person is legally allowed to transmit an emergency call for help on an amateur radio, thus, owning one could saver your life.


The radio pictured above is a Baofeng UV-5R. It is OBVIOUSLY not American made, but this is a cheap, reliable radio that can be owned by anyone for $40 US Dollars. I have two of them, and carry one with me daily. The UV-5R's are amazingly versatile. They are equipped with FM radio, marine frequencies, NOAA weather frequencies, VHF and UHF frequencies which will allow you to listen to most local emergency responders, and they even have a flashlight feature. At this cost, anyone can purchase and own an amateur radio that they can use to listen to and communicate with. A radio similar to this should be a part of everyone's emergency disaster kit, and at $40, you should have one in the house, and in each vehicle you own.


Alternative forms of communication include CB radios, FRS radios, shortwave radios, televisions, etc. But I feel that none of these options have the versatility that you could have with an amateur radio, and I would highly recommend you keep one as a way to learn what is happening around you.

Wednesday, February 27, 2013

Getting started in blacksmithing

It should come as no surprise to most who know me that I have some abnormal hobbies. Well, abnormal is subjective, because I think it is totally normal. I have always had a fascination with the "old way" of doing things. I enjoy making things by hand, with traditional tools. I love to study technology from early time periods...firecraft, homesteading, tool making, and self reliance. So one day I decided that I wanted to learn something new: Blacksmithing!

My interest began like most my interests do...on the internet, doing research. I eventually purchased a book and began to learn about the art. From the techniques used to create things, to how to build the forge. Going to a local scrap yard, I was able to speak with the owner, who happened to have an anvil for me. a 136 pound, rusty, crude looking anvil. He cut me a deal, $10.00, to get it out of his shop. Little did I know what that hunk of metal I bought was valued at!


A little clean up with a wire wheel, and the anvil became a much prettier piece of steel! I was able to identify the anvil as a Arm and Hammer, worth much more than $10.00 to say the least.


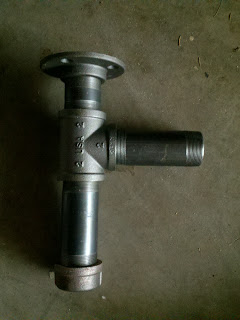
So once I bought the anvil, it was time to build the forge and stand. The forge design was easy. One search on Google and I came of with the brake drum forge. Thanks to a guy at work, I got my hands on a drum for free. Then I bought some sections of 2 inch black pipe to create the forge base piping. The drum is attached to the floor flange by drilling holes and simply bolting it on.


Then I bought two sections of 6x4 treated lumber. I measured the right length and cut the sections. I had trouble cutting them all to the right length, so I had to put some work into evening them out. I then used some hardwood for a top and bottom plate. (The anvil rusted a little since it was sitting in the garage during a temperature swing. A little more wire wheel treatment should get rid of it).


And that's it! My poor neighbors may soon hear the ping! ping! ping! of metal being pounded and twisted into awesomeness.

Thursday, February 21, 2013

New website design!

Beardventures has been re-designed! I am going to start categorizing all my blog posts into the categories at the top of the page. I will reserve the main page for updates, important blog posts, and GIVEAWAYS! With any luck I will be starting some giveaways for anyone who follows my blog and comments. Details will come later!

Tuesday, February 19, 2013

Cold Weather Survival Shelter Testing

Last week a friend and I decided to go on a winter bushcraft/survival skills trip. The projected low for the night was 15 degrees with a wind chill of 9 degrees. Actual was 12 degrees, with wind chill at 6 degrees. So it was cold to say the least. The perfect night to build a debris hut!

Our first order of business was to select a suitable camp location. The property we were on had a large stream running through it, so water was not an issue. We eventually settled on a location right along the stream, and slightly elevated to stay out of the cold sink. We decided a two-person debris hut would be the most appropriate shelter given the cold conditions, so we began constructing the frame. We placed the foot end towards the wind, and constructed the hut much like a traditional debris hut, but built a flat roof connecting the two hut frames.


The sides and roof were constructed by lashing a few cross pieces to keep the framing sections from rolling off the frame.


The sides were then filled in with leaves. As long as you pile leaves starting at the bottom and building upwards, they don't fall through the framework. At least 2 feet of debris is necessary to insulate and keep the wind out.


We then started a fire, which carried us through the evening. 12 degrees was manageable with a good fire, and the woods provided plenty of dead wood for the fire. The shelter turned out to be pretty warm. We did cheat and use camp pads (hey, we can't leave ALL the luxuries behind) and sleeping bags. Without them we would have been cold, but alive!